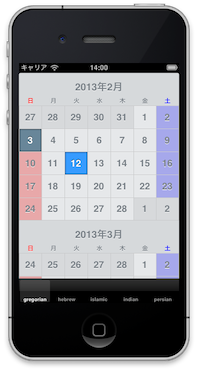
TimesSquareの表示を少しいぢってみる
このままでも十分良い感じなのだけど、ちょこっと表示部分をいぢってみた。
ソースコードにカスタマイズの方法が書いてあるので、それに従って今回は曜日表示の「日曜日」を「赤」、「土曜日」を「青」にしてみた。

修正したのは曜日を表示するコードの部分と、バックグラウンドの絵に赤と青を加えただけ。
絵の方は特に説明は必要ないので、曜日を表示する部分のカスタマイズについて簡単に説明。
曜日を表示する部分はライブラリの「TSQCalendarMonthHeaderCell」が行っている。
で、ライブラリの「TSQCalendarMonthHeaderCell.h」に表示をカスタマイズしたければ「TSQCalendarMonthHeaderCell」のサブクラスを作って「- (void)createHeaderLabels」をオーバーライドしろってある。
というわけで、今回は「TSQCalendarMonthHeaderCell」のサブクラス「ColoredTSQCalendarMonthHeaderCell」を作って曜日の表示部分に色を付けてみた。
コードはこんな感じ。
- (void)createHeaderLabels;
{
    NSDate *referenceDate = [NSDate dateWithTimeIntervalSinceReferenceDate:0];
    NSDateComponents *offset = [NSDateComponents new];
    offset.day = 1;
    NSMutableArray *headerLabels = [NSMutableArray arrayWithCapacity:self.daysInWeek];

    NSDateFormatter *dayFormatter = [NSDateFormatter new];
    dayFormatter.calendar = self.calendar;
    dayFormatter.dateFormat = @"cccccc";

    for (NSUInteger index = 0; index < self.daysInWeek; index++) {
        [headerLabels addObject:@""];
    }

    for (NSUInteger index = 0; index < self.daysInWeek; index++) {
        NSInteger ordinality = [self.calendar ordinalityOfUnit:NSDayCalendarUnit inUnit:NSWeekCalendarUnit forDate:referenceDate];
        UILabel *label = [[UILabel alloc] initWithFrame:self.frame];
        label.textAlignment = UITextAlignmentCenter;
        label.text = [dayFormatter stringFromDate:referenceDate];
        label.font = [UIFont boldSystemFontOfSize:12.f];
        label.backgroundColor = self.backgroundColor;
        if (index==6) {
            label.textColor = [UIColor redColor];
        }
        else if (index==5) {
            label.textColor = [UIColor blueColor];
        }
        else {
            label.textColor = self.textColor;
        }
        label.shadowColor = [UIColor whiteColor];
        label.shadowOffset = self.shadowOffset;
        [label sizeToFit];
        headerLabels[ordinality - 1] = label;
        [self.contentView addSubview:label];

        referenceDate = [self.calendar dateByAddingComponents:offset toDate:referenceDate options:0];
    }

    self.headerLabels = headerLabels;
    self.textLabel.textAlignment = UITextAlignmentCenter;
    self.textLabel.textColor = self.textColor;
    self.textLabel.shadowColor = [UIColor whiteColor];
    self.textLabel.shadowOffset = self.shadowOffset;
}
やっていることは簡単。
ラベルの色をセットする際に「日曜日(index==6)」か「土曜日(index==5)」ならそれぞれ色を「赤」と「青」にしているだけ。
簡単!
で、後は「TSQCalendarView」の「headerCellClass」に「ColoredTSQCalendarMonthHeaderCell」をセットするだけ。
これは「TSQTAViewController.m」の最初の方でこんな感じに。
- (void)loadView;
{
    TSQCalendarView *calendarView = [[TSQCalendarView alloc] init];
    calendarView.calendar = self.calendar;
    calendarView.rowCellClass = [TSQTACalendarRowCell class];
    calendarView.headerCellClass = [ColoredTSQCalendarMonthHeaderCell class];
    calendarView.firstDate = [NSDate date];
これで「TimesSquareTestApp」を起動すると曜日の表示部分で日曜日が赤、土曜日が青になる。