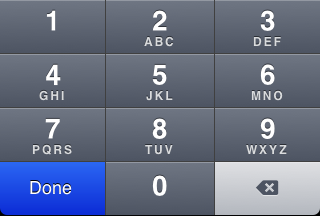
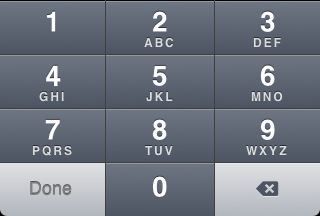
UIKeyboardTypeNumberPadにDoneキーを付ける手順
方法はココにある方法をほぼそのまま使って、ボタンのハイライトなんかもそれらしく設定。
ボタンはクラス変数で持って、キーボードが隠れる時の処理に UIKeyboardWillHideNotification を使ってみた。
あと、アニメーションはブロックにして completion でボタンを Superview から剥がしてる。
とにかく肝なのはボタンをどのウィンドウのどの位置に貼るか?って事で、それは前出のページでしっかり調べられているので楽チンだった。
それぞれのコードはこんな感じ。
interface部
@interface ViewController : UIViewController {
	IBOutlet UITextField *textField;
	UIButton *doneButton;
}

@end
Notification の登録
- (void)viewWillAppear:(BOOL)animated
{
    [super viewWillAppear:animated];

	//	Notification 登録
	[[NSNotificationCenter defaultCenter] addObserver:self selector:@selector(keyboardWillShow:) name:UIKeyboardWillShowNotification object:nil];
	[[NSNotificationCenter defaultCenter] addObserver:self selector:@selector(keyboardWillHide:) name:UIKeyboardWillHideNotification object:nil];
}

- (void)viewDidAppear:(BOOL)animated
{
    [super viewDidAppear:animated];
}
キーボードが現れるとき
- (void)keyboardWillShow:(NSNotification*)note
{
	// ボタン作成
	doneButton = [UIButton buttonWithType:UIButtonTypeCustom];

	// ボタンのタイトル設定
	[doneButton setTitle:@"Done" forState:UIControlStateNormal];
	[doneButton setTitleColor:[UIColor whiteColor] forState:UIControlStateNormal];
	[doneButton setTitleShadowColor:[UIColor blackColor] forState:UIControlStateNormal];
	[doneButton setTitleColor:[UIColor grayColor] forState:UIControlStateHighlighted];
	[doneButton setTitleShadowColor:[UIColor darkGrayColor] forState:UIControlStateHighlighted];
	doneButton.titleLabel.shadowOffset = CGSizeMake(0, -1);

	// ボタンの背景設定
	[doneButton setBackgroundImage:[UIImage imageNamed:@"doneButtonNormal"] forState:UIControlStateNormal];
	[doneButton setBackgroundImage:[UIImage imageNamed:@"doneButtonHighlighted"] forState:UIControlStateHighlighted];

	// ボタンが押されたら doneButton を呼ぶ
	[doneButton addTarget:self action:@selector(touchDoneButton:) forControlEvents:UIControlEventTouchUpInside];

	// キーボードの最終表示位置と、アニメーション時間を NSNotification の userInfo から取得
	CGRect keyboardFrame = [[note.userInfo objectForKey:UIKeyboardFrameEndUserInfoKey] CGRectValue];
	CGFloat duration = [[note.userInfo objectForKey:UIKeyboardAnimationDurationUserInfoKey] doubleValue];

	// ボタンもキーボードに合わせてアニメーションさせるために、最終表示位置とキーボードの高さ分だけ下のスタート位置を用意
	CGRect startFrame = CGRectMake(-3.0f, 427.0f + CGRectGetHeight(keyboardFrame), 108.0f, 53.0f);
	CGRect fixedFrame = CGRectMake(-3.0f, 427.0f, 108.0f, 53.0f);

	// ボタンをスタート位置に配置
	doneButton.frame = startFrame;

	// ボタンを張り付けるウィンドウはアプリケーションの 2 番目のウィンドウで、index=0 のサブビューにしないと角が丸くならない
	UIWindow* window = [[[UIApplication sharedApplication] windows] objectAtIndex:1];
	[window insertSubview:doneButton atIndex:0];

	// アニメーションスタート
	[UIView animateWithDuration:duration
					 animations:^{
						 doneButton.frame = fixedFrame;
					 }
	 ];
}
ボタンが押されたとき
- (void)touchDoneButton:(UIButton*)sender
{
	// キーボードを非表示にします。
	[self.view endEditing:YES];
}
キーボードが消えるとき
- (void)keyboardWillHide:(NSNotification*)note {
	// ボタンを消すアニメーションの為にキーボードの最初と最後の位置、そして時間を NSNotification の userInfo から取得
	CGRect keyboardBeginFrame = [[note.userInfo objectForKey:UIKeyboardFrameBeginUserInfoKey] CGRectValue];
	CGRect keyboardEndFrame = [[note.userInfo objectForKey:UIKeyboardFrameEndUserInfoKey] CGRectValue];
	CGFloat duration = [[note.userInfo objectForKey:UIKeyboardAnimationDurationUserInfoKey] doubleValue];

	// キーボードの移動距離(newCenter)を計算
	CGFloat dx = keyboardEndFrame.origin.x - keyboardBeginFrame.origin.x;
	CGFloat dy = keyboardEndFrame.origin.y - keyboardBeginFrame.origin.y;
	CGPoint newCenter = CGPointMake(doneButton.center.x+dx, doneButton.center.y+dy);

	// キーボードの移動距離分だけボタンもアニメーションして移動後、Superview から外す
	[UIView animateWithDuration:duration
					 animations:^{
						 doneButton.center = newCenter;
					 }
					 completion:^(BOOL finished){
						 [doneButton removeFromSuperview];
					 }
	 ];
}
こんな感じで標準っぽい見た目で動いてる。


でも、ハイライトの時の影の付け方が違ってる…。どうしたら良いんだろう?
あ!フォントも違うか!
とりあえずサンプルコードを bitbucket に置いておいたので、サクっと動かしてみたい方はどうぞ。