Xcode 4 で新規に作ったプロジェクトに AdMob をくっ付けてみる
せっかくなので自分で新規にプロジェクトを作って、それに AdMob をくっ付けてみた。
作成したのは自分でよく使う「Tab Bar Application」を使ってみた。
手順
1. Xcode 4で「Tab Bar Application」を選択して新規に「AdMobTabBar」プロジェクトを作成

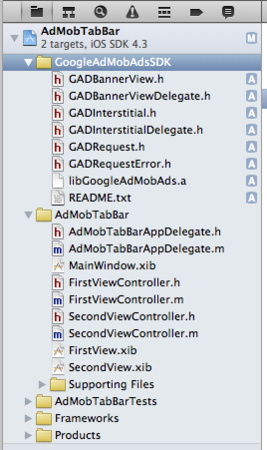
2. AdMob の SDK をプロジェクトにドラッグ&ドロップして加える(この時「Copy items into destination group's folder(if needed)」はチェックする。)

3. AdMob に必要なフレームワークを加える(必要なのは AudioToolbox, MediaPlayer, MessageUI, SystemConfiguration。Xcode 4 で framework を加える方法はこちら。)

以上で準備はOK。
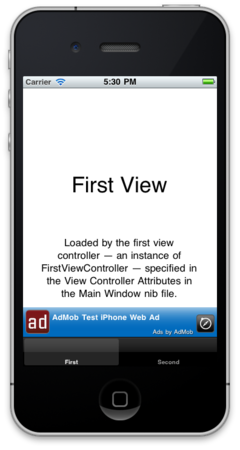
後は表示するコードを書くだけ。今回は広告のサンプルで良くある、広告が用意されたら TabBar の上ににょきっと出てくるタイプでやってみた。
まずは FirstViewController.h
基本的に AdMob のサンプルコードと同じだけど GADBannerViewDelegate プロトコルに対応する部分がちょっと違う。
//
//  FirstViewController.h
//  AdMobTabBar
//
//  Created by paraches on 11/03/22.
//  Copyright 2011 paraches. All rights reserved.
//

#import <UIKit/UIKit.h>

#import "GADBannerView.h"

@interface FirstViewController : UIViewController <GADBannerViewDelegate> {
	GADBannerView *bannerView_;

}

@end
次に FirstViewController.m
広告の貼付け位置の計算と、GADBannerViewDelegate プロトコル対応で delegate のセット、そして広告が準備できたときのアニメーション部分が違っている。
もちろん「@"xxxxxxxxxxxxxxx"」は各人のパブリッシャー ID で置き換える。
//
//  FirstViewController.m
//  AdMobTabBar
//
//  Created by paraches on 11/03/22.
//  Copyright 2011 paraches. All rights reserved.
//

#import "FirstViewController.h"

#define	MY_BANNER_UNIT_ID	@"xxxxxxxxxxxxxxx"
#define ANIMATION_DURATION	0.5f
#define TABBAR_HEIGHT		49.0f

@implementation FirstViewController

// Implement viewDidLoad to do additional setup after loading the view, typically from a nib.
- (void)viewDidLoad
{
    [super viewDidLoad];

    // Create a view of the standard size at the bottom of the screen.
    bannerView_ = [[GADBannerView alloc]
                            initWithFrame:CGRectMake(0.0,
                                            self.view.frame.size.height -
                                            TABBAR_HEIGHT,
                                            GAD_SIZE_320x50.width,
                                            GAD_SIZE_320x50.height)];

    // delegate の設定
    bannerView_.delegate = self;

    // Specify the ad's "unit identifier." This is your AdMob Publisher ID.
    bannerView_.adUnitID = MY_BANNER_UNIT_ID;

    // Let the runtime know which UIViewController to restore after taking
    // the user wherever the ad goes and add it to the view hierarchy.
    bannerView_.rootViewController = self;
    [self.view addSubview:bannerView_];

    // For Testing
    GADRequest *rq = [GADRequest request];
    rq.testing = YES;

    // Initiate a generic request to load it with an ad.
    [bannerView_ loadRequest:rq];
}


- (BOOL)shouldAutorotateToInterfaceOrientation:(UIInterfaceOrientation)interfaceOrientation
{
    // Return YES for supported orientations
    return (interfaceOrientation == UIInterfaceOrientationPortrait);
}


- (void)didReceiveMemoryWarning
{
    // Releases the view if it doesn't have a superview.
    [super didReceiveMemoryWarning];

    // Release any cached data, images, etc. that aren't in use.
}


- (void)viewDidUnload
{
    [super viewDidUnload];

    // Release any retained subviews of the main view.
    // e.g. self.myOutlet = nil;
}


- (void)dealloc
{
    bannerView_.delegate = nil;
    [bannerView_ release];

    [super dealloc];
}

- (void)adViewDidReceiveAd:(GADBannerView *)view {
    [UIView animateWithDuration:ANIMATION_DURATION
                     animations:^{
                         bannerView_.center = CGPointMake(bannerView_.center.x, bannerView_.center.y-TABBAR_HEIGHT);
                     }];
}

@end
かなりサックリとできあがる。

後は横向きをどうするか考えたり、2番目のタブにも表示できるようにしたり、色々と発展させていけば良い感じに表示できるようになると思う。
とりあえず、今回のサンプルはココに置いておきます。
注意:AdMob の設定で自動で広告内容をアップデートする設定にしてある場合、このサンプルだと広告がアップデートされる度にどんどん動いてしまいます!